The Ins and Outs of Test Automation - Part IV
- Minduli Wijayatunga
- Jun 16, 2021
- 4 min read
Updated: Jun 19, 2021

Hi, I'm Minduli. I am a software engineer at Atalgo Computing. We are launching Flame, a new codeless test automation platform for mobile, web and API testing! During these exciting times, I'm here to tell you more about test automation and Flame through a series of posts just like this one. So, sit tight and enjoy the ride!
For training and beta testing purposes, once you are subscribed to our software, you will be able to access our test instance through your own login credentials. Flame is an enterprise-grade self-service based platform which means that you will be able to set up new projects, add new testers, as well as schedule and conduct automated testing. You can also set up Slack or Teams notifications from Flame Settings itself.
In this article, we are looking at how to run a simple automated mobile test using Flame.
Here is how you can automate a simple test case that will check the functionality of a simple open-source to-do app called Minimal. The source code for this app can be found here.
1. Setup and run the mobile application you want to test.
First, we need to set up and run the Minimal app. Here you can either download the source code and open the app through Android Studio Emulator, or download the app on your phone and connect your phone to your computer that has an instance of Flame.
Figure 1 shows the setup that we have utilised. Here we have chosen to run the Minimal app on an emulated Nexus 6P API 30 mobile using Android Studio.

Figure 1 : The minimum app run on Android Emulator
2. Download and Launch Appium.
Appium is an open-source test automation framework for mobile application testing. To test mobile applications through Flame, we need to have Appium installed in our local system. You can download Appium from here.
Once you have downloaded and opened Appium, you will be guided to the screen in Figure 2. By default, Appium is hosted on port 4723, and this is the port through which it will connect with Flame. So in this step, you have to simply click on Start Server to allow Appium to run on your local device.
Once the Appium server is running, you will be able to see the screen in Figure 3.

Figure 2: Start Server screen on Appium Desktop

Figure 3: Running Appium Server
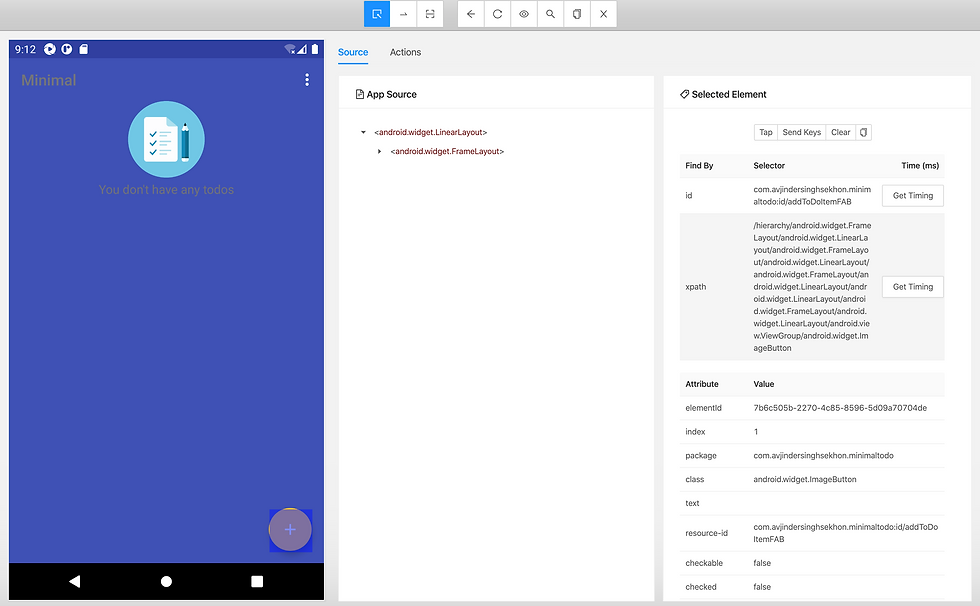
For developing test scripts, we need to know what locators are present in our mobile application. This information can be accessed by clicking on the Start Inspector Session option (magnifying glass icon) on Appium shown in Figure 3. This will bring up the interface shown in Figure 4.

Figure 4: Start Inspector Session interface on Appium Desktop
Here, you have to set the platformName property as Android before clicking on the Start Session button. This will take you to the interface shown in Figure 5. This shows a copy of your emulator mobile screen, and you can click on various elements on it to see what their locator tags are.

Figure 5: Inspector Session on Appium Desktop
3. Write a test script.
Now that you have an emulator/phone with the test app running, Appium connected and the locator tags of various elements of the test application ready to be accessed, you can start writing a test script.
The following is an example script that can be used to check the add function of the Minimal app.
description: Mobile app demo
actors:
  - actor: MOB
    segments:
      - segment: 1
        actions:

          - description: Click on add new To do item option
            action: org.flame.appium.Tap
            args:
              locator : {xpath: '/hierarchy/android.widget.FrameLayout/android.widget.LinearLayout/android.widget.FrameLayout/android.widget.LinearLayout/android.widget.FrameLayout/android.widget.LinearLayout/android.widget.LinearLayout/android.widget.FrameLayout/android.widget.LinearLayout/android.view.ViewGroup/android.widget.ImageButton'}


          - description: Type in Title
            action: org.flame.appium.SendKeys
            args:
              locator : {xpath: '/hierarchy/android.widget.FrameLayout/android.widget.LinearLayout/android.widget.FrameLayout/android.widget.LinearLayout/android.widget.FrameLayout/android.widget.LinearLayout/android.widget.FrameLayout/android.widget.LinearLayout/android.view.ViewGroup[2]/android.widget.LinearLayout/android.widget.LinearLayout[1]/TextInputLayout/android.widget.EditText'}
              text: Luvo Demo

          - description: Type in description
            action: org.flame.appium.SendKeys
            args:
              locator : {xpath: '/hierarchy/android.widget.FrameLayout/android.widget.LinearLayout/android.widget.FrameLayout/android.widget.LinearLayout/android.widget.FrameLayout/android.widget.LinearLayout/android.widget.FrameLayout/android.widget.LinearLayout/android.view.ViewGroup[2]/android.widget.LinearLayout/TextInputLayout/android.widget.EditText'}
              text: Make a mobile script for the demo

          - description: Click Slider to set reminder
            action: org.flame.appium.Tap
            args:
              locator : {xpath: '/hierarchy/android.widget.FrameLayout/android.widget.LinearLayout/android.widget.FrameLayout/android.widget.LinearLayout/android.widget.FrameLayout/android.widget.LinearLayout/android.widget.FrameLayout/android.widget.LinearLayout/android.view.ViewGroup[2]/android.widget.LinearLayout/android.widget.LinearLayout[2]/android.widget.LinearLayout/android.widget.Switch'}


          - description: Set a Date
            action: org.flame.appium.Tap
            args:
              locator : {xpath: '/hierarchy/android.widget.FrameLayout/android.widget.LinearLayout/android.widget.FrameLayout/android.widget.LinearLayout/android.widget.FrameLayout/android.widget.LinearLayout/android.widget.FrameLayout/android.widget.LinearLayout/android.view.ViewGroup[2]/android.widget.LinearLayout/android.widget.LinearLayout[2]/android.widget.LinearLayout[2]/android.widget.LinearLayout/android.widget.EditText[1]'}

          - description: Change the year
            action: org.flame.appium.Tap
            args:
                  locator : {xpath: '/hierarchy/android.widget.FrameLayout/android.widget.FrameLayout/android.widget.FrameLayout/android.widget.LinearLayout/android.widget.ScrollView/android.widget.LinearLayout/android.widget.LinearLayout/android.widget.Button[2]'}

          - description: Click 2022
            action: org.flame.appium.Tap
            args:
              locator : {xpath: '//android.widget.TextView[@content-desc="2022"]'}

          - description: Click Ok
            action: org.flame.appium.Tap
            args:
              locator : {xpath: '/hierarchy/android.widget.FrameLayout/android.widget.FrameLayout/android.widget.FrameLayout/android.widget.LinearLayout/android.widget.LinearLayout/android.widget.Button[2]'}

          - description: Click Ok
            action: org.flame.appium.Tap
            args:
              locator : {xpath: '/hierarchy/android.widget.FrameLayout/android.widget.LinearLayout'}


          - description: Click ok again
            action: org.flame.appium.Tap
            args:
              x : 1275
              y : 728

          - description: Add one more to do.
            action: org.flame.appium.Tap
            args:
              locator : {xpath : '/hierarchy/android.widget.FrameLayout/android.widget.LinearLayout/android.widget.FrameLayout/android.widget.LinearLayout/android.widget.FrameLayout/android.widget.LinearLayout/android.widget.LinearLayout/android.widget.FrameLayout/android.widget.LinearLayout/android.view.ViewGroup/android.widget.ImageButton'}

          - description: Changed my mind.
            action: org.flame.appium.Tap
            args:
              locator : {xpath : '//android.widget.ImageButton[@content-desc="Navigate up"]'}
Script 1: Mobile test script for Flame
As described in The Ins and Outs of Test Automation - Part II, at this stage you can integration your Slack or Teams channels with Flame, so that once you run your test script, the results will be readily seen by your peers.
4. Run the test.
Now you can run your test script on Flame, exactly the same way as described in The Ins and Outs of Test Automation - Part II.
Video 1: Running the mobile test script on Flame.


Comments